The Innamincka Affair: Love. Lies. Mortal Danger. A lot can happen with an affair at Innamincka. Rebecca Boucher is a respected junior partner in a London law firm. When she’s sent to Australia to meet with the owner of a vast cattle property, she’s expecting a straightforward legal matter. But what she finds is Cooper Read More ...
Marriage in a Cold Climate View it on the UK Amazon Store The stark beauty of the frozen wastes of Siberia, where the cold can snap steel rails, and the empty sweep of the tundra, alternately a snow-muffled wasteland and an unexpectedly safe trackside haven, are vividly evoked. Against this backdrop, Robert Chalmers weaves an Read More ...
The Dragons of Sara Sara Innocence and terror meet in a fast-paced evocation of a time far in the future. Set among momentous happenings, Robert Chalmers catches a society on the brink of a new age. View it on the UK Amazon Store In an age far ahead in time, two young people from very Read More ...
The biggest hurdle faced by those who only use Scrivener a few times a year is formatting for print books. So lets set up a Compile Template.
First Note of Importance. I can see no way that setting Facing Page options is possible with the Windows/PC version of Scrivener at this stage. Maybe V3 if it ever comes out. You can save your settings to a Preset but your document will still need modification if it is to be used for an ACTUAL print book. Because you can not set the facing pages gutter sizes differently in the PC version that I know of. So while much is the same, and the little Windows/PC Guide at the very end of this article is all you have, that may be enough for you.
This whole guide is aimed at saving a Print Book preset using the MAC version of Scrivener, that has the Facing Pages setting in Page Setup section. The PC version does not have this option. This means that you can set up your PDF compiled output to be Print Ready. Including correct gutters for facing pages or if you like, Recto and Verso page gutters. Submit to your favourite publisher, and be happy.
It may also help you save your presets for other formats. Like eBooks and if you must – Word. eBooks don’t care about gutter size or indeed book page size, but there are lots of things you can set, save in a preset, and then forget. Very useful.
Put together by Robert Chalmers. The writer of Fantasy, Romance and Thrillers, and the odd non-fiction. Thanks to Gwen Hernandez. and Mike Cooley
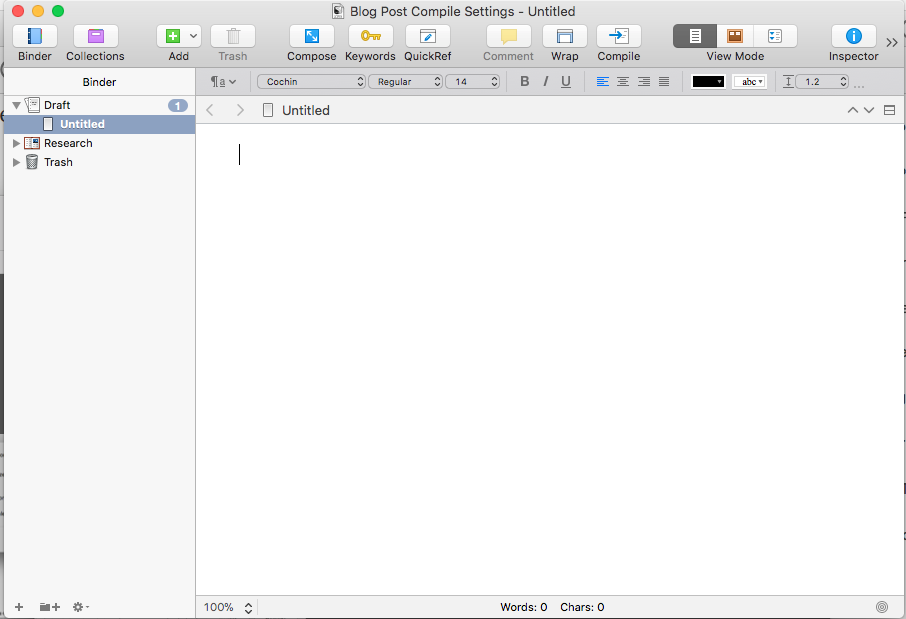
Compile Template for Scrivener to PDF. The Mac version.
Let’s see if we can get this step by step. There are numerous blog posts about this, but I”d like to try and condense them into one place if for no other reason than my own reference. So let’s start at step 1. I’ll reference my sources at the end of this blog post. Sometimes the steps may seem to back-track on each other, but stick with it. It makes sense in the end.
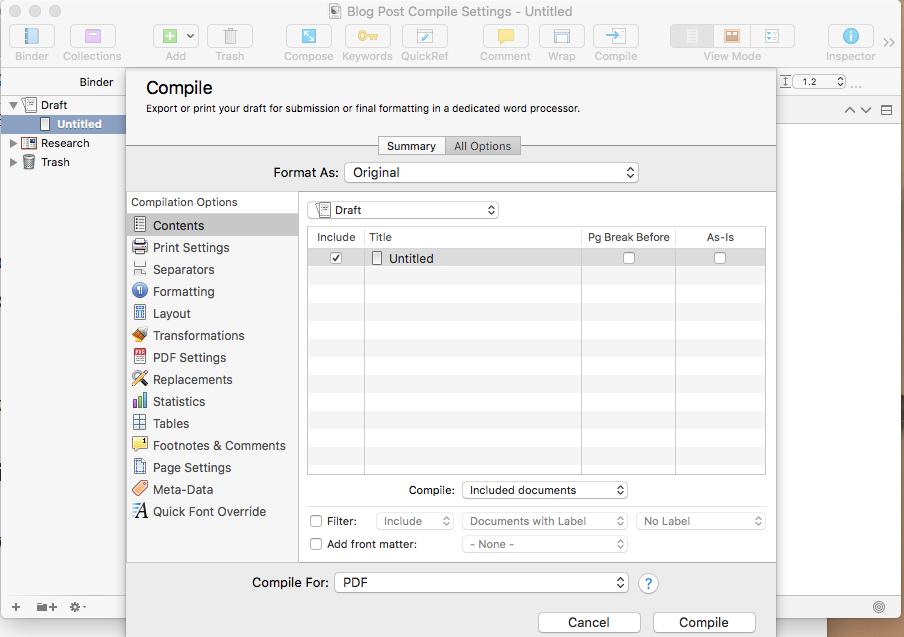
Get the Page and Compile settings right.
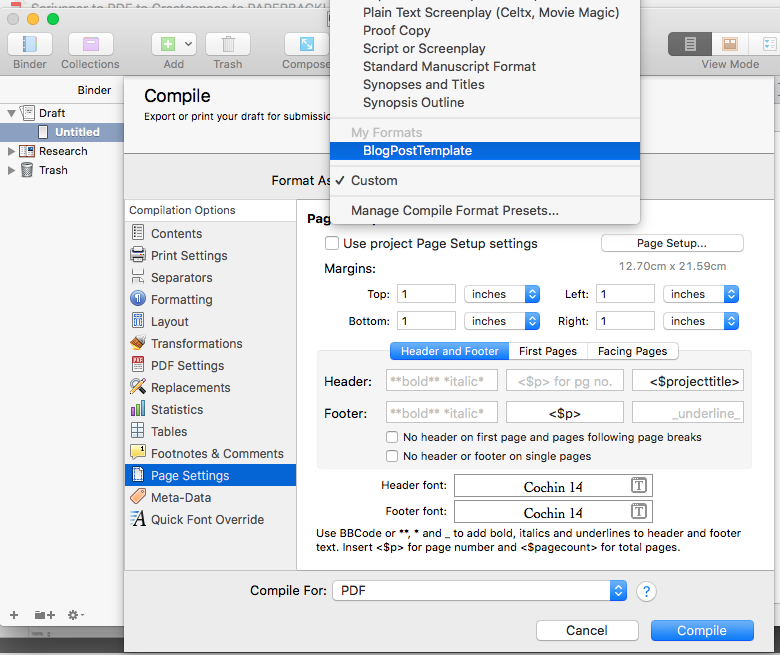
Go to File -> Compile in the Menu bar and pick Compile for: PDF
Now, Don’t forget this next step.
Select Page Settings from the left-hand side Compile Options.
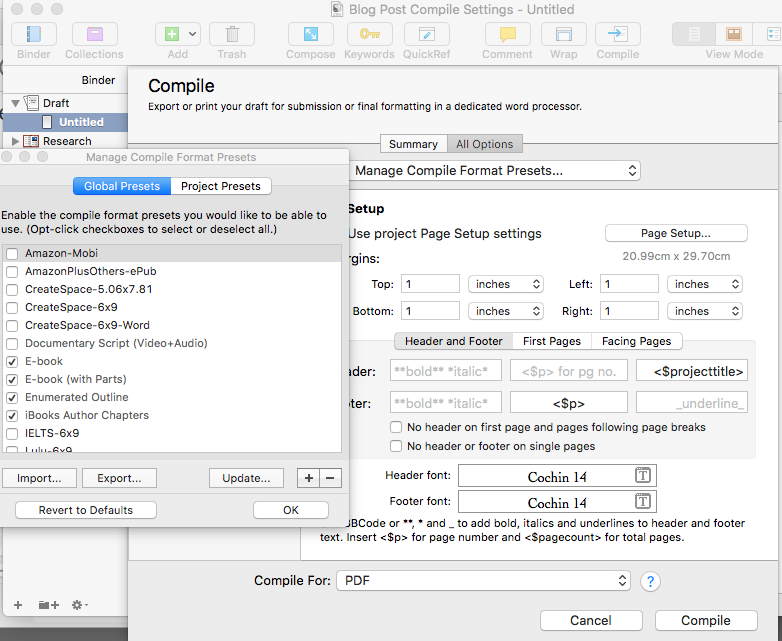
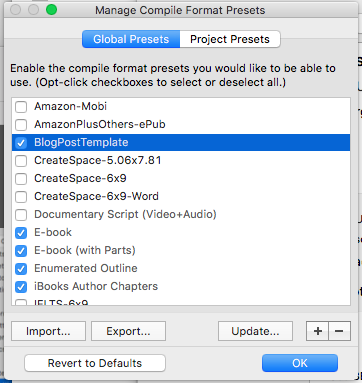
2. Select the drop-down arrows in the box at the top, for Format As and select “Manage Compile Format Presets”.
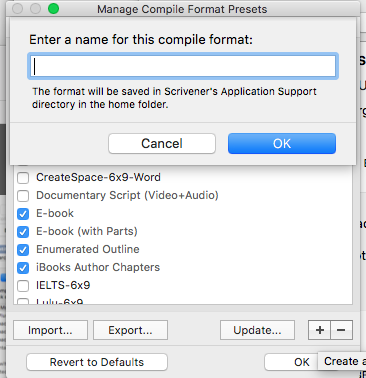
Select the + option to add a new preset.
I called mine BlogPostTemplate. I could have used BlogPostPreset – but it’s too late now…
Click OK, and it’s saved. Are you still on the Page Settings tab of the Compile Options? You should be.
The Page Setup button on the right will be greyed out.
Untick the box in the Main Page Setup area that says Use project Page Setup settings.
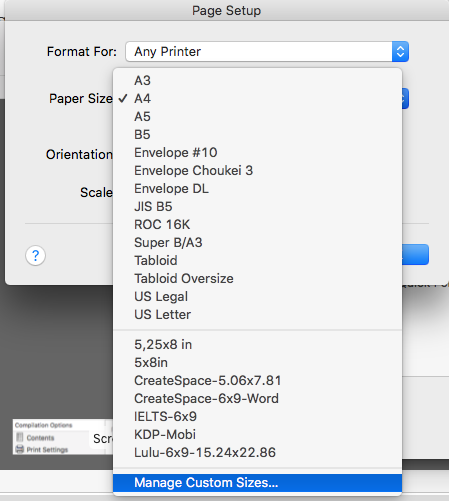
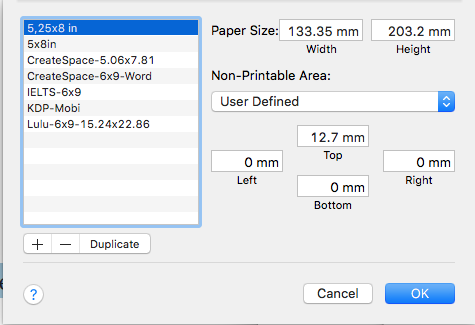
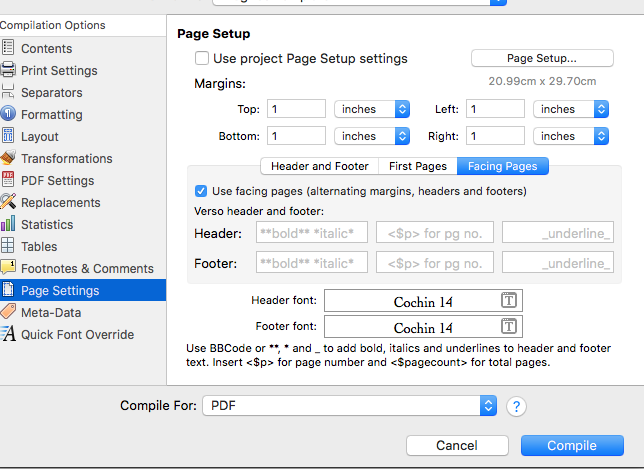
Click on Page Setup (there’s two right) on the right in that box, and now pull down the Paper Size drop-down and pick Manage Custom Sizes.
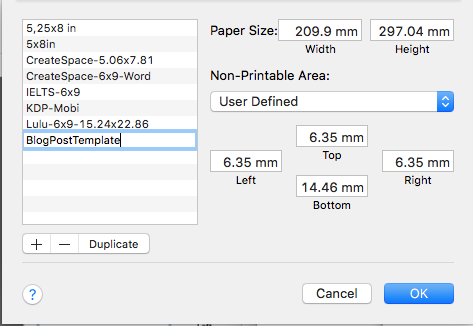
Here you want to Add your own. So click on the + button at the bottom of the list. It will insert a name “untitled” into the list. Double click on that an rename it to… in my case, BlogPostTemplate. You can see others I have previously created there already.
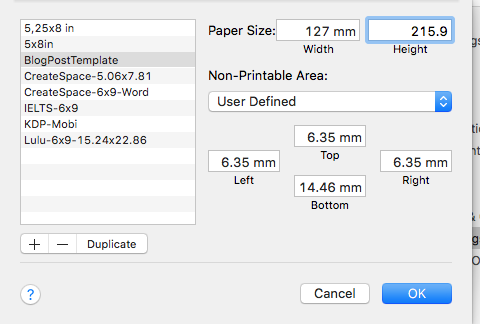
Now here’s a tricky part. As you see in MY example, the sizes are in mm. Most book publishers give the sizes in inches. So you either convert or change how your computer displays measurements. So I set this one to 5.5×8.5 inches, just to give an example. That’s 127mm x 215.9. Leave the other settings. Click OK and OK.
Click OK,
You see this and click OK if you do.
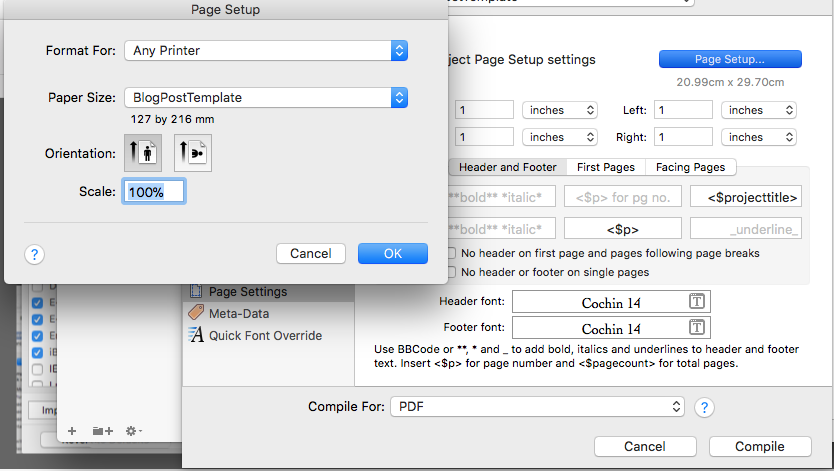
Now you should be back to the original Page Setup screen.
You should be able to see the NEW page size displayed now on the Page Setup screen along with the name of the new preset template.
Next steps…
On a Mac, hold down the ALT key, and you will see the word Compile change to Save. The setup screen will disappear. Your template has been saved.
Now you should have your standard, editing screen back in place. At this point, you don’t actually want to compile your document.
Click on File -> Compile again, and it should still say “Compile for: PDF”. But up the top, it says Format As: Custom again.
Click the Dropdown Arrows in that box, and there’s your preset template. Select it and you are back to your main editing screen.
Now. Traps for the unwary player. The part that gets me pulling my hair out because I ALWAYS forget this step. Any other changes you make can also be saved in this Preset. But you have to be careful how you do it.
Now you are back to your page settings page in the Compile Options… you want to make other changes and save them. Right. So next time everything is done automagically for you. Even twelve months from now when you finish your next book.
Don’t immediately use the ALT key (mac) to save settings. It doesn’t save some of them. Instead do this as well.
Say you want to change Header and Footer and First Page and Facing Page options etc. And you will want to I’m sure. For example, especially with PRINT and PDF, which you want to use to print with.. you need to use the FACING pages option. That changes the gutter margins right? See the little tick in the box. Now how do I get that little sucker to save?
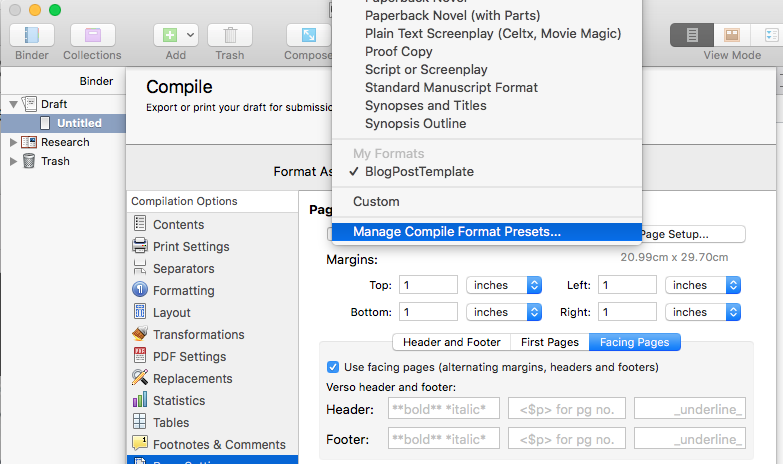
Once you make your change(s) go back to Format As at the top, and select Manage Compile Presets. The key word being Manage.
You will see your Template Preset – in this case, BlogPostTemplate. (If you don’t see it – you didn’t save it correctly the first time through. Go back to jail – do not pass Go. Do not collect $200… Oh, you have it? Great.
Now click “Update”
It will ask you to overwrite the existing template – click OK. and OK again to take you back to options.
Then – just to be on the safe side – remember some options save this way, others need the ALT key to change Compile to Save. Cllick that. And presto-bumpo. You have your preset.
Now when you compile to a PDF, select your brand new shiny FormatAs “My Beautiful Template” and PDF options and click compile.
It will produce a PDF file formatted for the CORRECT size PDF for the book you want, for KDP/CreateSpace, Lulu or whatever publisher you want. You need never go near Word again.
2. Set the options for Content, Text Options, and Formatting exactly the way you want to save them. The only options that won’t be saved are the document and folder selections, since these are project specific.
3. Click the Format As drop-down menu at the top of the window and choose Manage Compile Format Presets.
4. Click the [+] button at the bottom right of the window that appears.
5. Enter a name for the saved settings (e.g. Novel Export, or Notes Only), and click OK. Click OK again to return to Compile.
6. Your saved preset now appears in the Format As drop-down menu, under My Formats.
I’m sure the Windows version of Scrivner will do the same things as this, but with different keystrokes. And probably reset/reboot six times while you are doing it.
2. Set the options for Content, Text Options, and Formatting exactly the way you want to save them. The only options that won’t be saved are the document and folder selections, since these are project specific.
3. Click the Save Preset button at the bottom left of the Compile window.
4. Enter a name for the saved settings (e.g. Novel Export, or Notes Only), and click OK.
5. Your saved preset now appears in the Format As drop-down menu, under My Formats.